Hatton House Diaries

One day, we decided to buy a 125 year old Victorian House in Des Moines, Iowa…….

Tools of the Trade – First, Get Your Wife’s Favorite Bowl February 18, 2013

Filed under: Remodeling and Design Projects — hattonhousedsm @ 6:41 am
Tags: , ,

imageDoug wanted me to write a post about moving the gas line to line up with Thermador specs, so you could see all the tools and various things he did to move the line and still make the floor under the stove look pretty. This photo shows pre-drilled pilot holes in the tile, the tile cutter drill bit he used to cut between the holes, the chisel and hammer he used to dig it all out….it was all very nicely done. But I think this blog post should be about selecting things to make up for what’s NOT in your tool box/work room.

wpid-2013-02-16_02-31-02_877.jpg
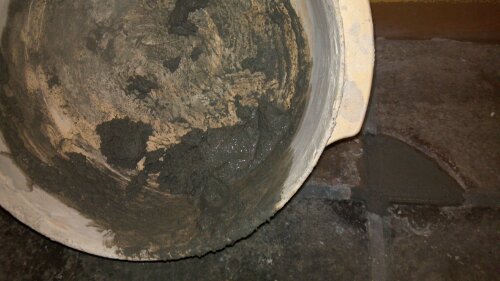
For instance, if you find yourself without a 5 gallon bucket or small bucket to mix mortar in, you SHOULD NOT go to the kitchen, and just take whatever bowl you find that looks like a nice size! That is what my husband did many years ago, when he took the biggest bowl of my Tupperware Stack Cooker to mix grout or mortar or whatever he did to permanently ruin the bowl for cooking. It’s kind of funny now (not really) that I’m trying to avoid cooking in the microwave, but at the time, it was the most expensive bowl I owned, and I was plenty pissed off about it. The good news? At least he’s hung onto it all these years, and is still using it as his mortar bowl. He’s pretty great at projects around the house, but now I know to point out every time we used them, which ones are my favorite bowls.  Sigh….


New Oven: Inaugurated

Filed under: In the Kitchen — hattonhousedsm @ 5:58 am
Tags:

image

Our daughter got the honors, with chocolate chip cookies.


Oh Hello Lover! The New Range Comes Home February 17, 2013

imageThe kitchen remodel continues, and today we hit a major milestone: the delivery of my forever stove: The Thermador 48″ Pro Harmony. We bought it after looking for months at several different appliance companies and falling in love with the Thermador star burners (no, they haven’t sponsored my blog, but I still need a refrigerator, Thermador PR!) The star burners are over a porcelain easy-clean surface, the oven racks slide out on casters, and all the controls just feel amazing.

Installing this gorgeous machine took nearly all day, so by the time it was hooked up at 7:30 PM, we really only had energy to make scrambled backyard chicken eggs, but that was enough to learn that these burners heat significantly faster than our previous stove. Nothing burned, and they really were the best eggs ever. We’ll try to bake something a little more worthy of this stove’s inaugural run tomorrow, as well as posting some back-story as to how we got the gas line in place and the stove into the house.


WHO TV: Historic Homes Preservation Story February 10, 2013

Filed under: Remodeling and Design Projects — hattonhousedsm @ 1:37 pm

I thought I’d linked to this story before, but in case you missed it, WHO TV’s Andy Fales (linked here) did a story about historic preservation in Des Moines’ River Bend, Drake, and Sherman Hill neighborhoods. He featured my friend, Steve Wilke-Shapiro of Silent Rivers and Des Moines Rehabbers Club, and several houses, including ours! Enjoy!


A Chicken Screams “Hawk!!” February 9, 2013

Filed under: Urban Farming — hattonhousedsm @ 9:34 am
Tags: , , ,

hawkA few weeks ago, my husband reported that there had been a hawk over our backyard, terrorizing our chickens. The hawk had gone so far as to capture a squirrel and eat his snack while glaring at our chickens, who were cowering under the back steps. We considered moving them under better cover, but they seemed to do a good job of protecting themselves, so off we went.

Then yesterday, I’d had a long day of appointments and kids home from school for conferences, and by 4:45, I was exhausted, and came to my back office and stared at my screen, trying to will myself to write. That’s when I heard it, the panicked screaming of my chickens, clearly freaking out about more than a laying box squabble. I leaned over to pull my curtain back just in time to see a hawk swoop down into the yard to more chicken freak out noises. I couldn’t see where it had landed, or if there were victims, so I jumped up, leapt over my Kindergarten son, yelling something about hawks and chickens, and ran for the back door.

In my head, there was a voice pointing out that perhaps I should have a plan. Was I going to wage war with the attacking hawk? Maybe I should find safety goggles if that was the case. The other voice in my head yelled that there was no time for goggles and plans, to just get out there….but stop long enough to switch shoes for slippers. No way that hawk’s going to take you seriously with sheepskin lined slippers on.

I got outside, and 11 of our 12 chickens were cowering under a leaf-naked bush, but they were unharmed, and apparently glad to see me. The 12th chicken was a bird my daughter named “Featherless,” because she is half plucked from other’s fighting with her. She lays huge eggs, so we keep her, and hope that she’ll one day feather out again, but so far…no luck. Apparently, her lack of feathers had made her an easy target. I concerned myself with getting the others to safety. They didn’t have any interest in my shooing them across the yard, so I started to carry them, two by two when I could manage it, back to the coop, while the hawk watched from a tree two houses down, apparently threatened by my very shiny Danskos. Take that, Hawk!

I got all but two of the chickens cooped up when out came the 12th chicken, Featherless! I’ve never been so happy to see our most ridiculous looking bird. Another 20 minutes of chicken-around-the-lilac-bush later, and all the girls were safe and sound. And I had gone in to open a nice bottle of red wine…


Refinishing Wood…the David Sweet Way February 8, 2013

This week (month?), I’m continuing the first floor woodwork refinishing, using the David Sweet method. David uses historically appropriate strippers and finishes (read: no poly) and creates finishes that look like they belong in a 125 year old house. The process takes longer than dip stripping and smacking on poly based finish, but the color is so deep and finish so rich, I can’t really argue with it. It’s my forever house, right?

I’m using a heat gun to remove paint when I have to, but my first choice is to find pieces without paint. My least favorite is pieces that have paint over bare wood, because you have to work extremely fast with the heat gun in order to avoid scorching the wood. Wood that’s been stained then painted is easy to work with a heat gun, working from the details out to the flat surfaces. After the heat gun, my biggest expense was the very nice respirator I purchased after working for an hour without one and feeling like I’d just taken a year off my life.

Best case, you start with a piece that looks like the one on the left, and you can scrape off what little paint is on it and not even involve paint removers. Be careful with strippers, as many can permanently damage some wood species. We used a mixture of denatured alcohol and old shellac from previous projects (this reminded me of something like sourdough starter) to remove the shellac and 100 years of wax and dirt buildup. I felt like I was flipping back through stories of maids who were too lazy to strip the previous year’s wax as I was removing all the layers by alternating my denatured alcohol starter and ragging off. That will leave you at the piece that looks like the left center plinth block.

The right center plinth has been coated with shellac. A few more coats of shellac would give it a true historic finish that is deep and rich. We were trying to match the color of our aged wood, as shellac will age into a darker reddish tone from it’s dark golden start with wax and years. You can pigment shellac, or add a stain layer for color. It takes some experimentation to get the exact color, but as you can see, the end result is gorgeous! Now, on to the miles of board I have left!


Help Design Our New Kitchen Island! February 7, 2013

We’ve got a fully functioning kitchen. It was almost everything we could want: plenty of storage, big fridge, soon-to-be dream range, dishwasher, big eat in space. What it doesn’t have is a permanent island, and since we want a prep sink, we’re going to get one. What I’m having trouble with is, what do you put in a center island in a kitchen that has almost everything?

I got thinking about this while reading The Kitchn’s 10 Easy, Low-Budget Ways to Improve Any Kitchen, because I like idea #6 for pull out shelves. We don’t really have a pantry, so those look like good alternative food storage sites. But I want to hear your ideas. What do you love most about your kitchen (or your friend’s, or the display model at the design center). What do you wish you had?

The potential real estate: around 6.5′ by 3.5′. It must include a prep sink. We want to know: if you were designing your dream kitchen, what “extras” would you add in a new center island?


The Best Kitchen Towels Make the Best Drywall Sponges February 6, 2013

Filed under: Remodeling and Design Projects — hattonhousedsm @ 12:48 am
Tags: ,

imageWhen we moved into the Hatton House, I decided I was too old for mismatched, worn out kitchen towels, so I invested in several nice (read: not cheap) towels from my favorite locally owned kitchen store, Kitchen Collage. My favorites were these thick, orange towels from nowdesigns. One of those towels was damp, and had been tossed on the floor, waiting to be carried up to laundry when I needed something damp to wipe down some drywall dust. I used the towel (hearing my mother cringe from a thousand miles away) and it was way too effective. I’d been finish sponging the drywall, to know down the dust and smooth out the final few edges. The sponge kept filling with dust, and was taking forever to wash between uses, but the towel could be folded several times so you could flip to a clean side over and over. It’s my new favorite trick for finishing drywall, and when washed immediately, came clean. I do suggest getting your own dedicated drywall towel, because I’m pretty sure if my husband had done the same thing, I would have been pissed he used my good towels for construction.